The Day After: From Phone Numbers to Email
Yesterday I solved my phone number privacy problem with a 1.5 euro disposable SIM card. Today? Time to tackle the email situation.
Remember when I mentioned I’d “probably just create a new Proton Mail account” because I’d used up all my aliases? Well, today’s that day.
And I decided to do it live on stream. Because apparently, I like making things interesting.
Black Friday Timing: Accidentally Perfect
Here’s the thing - I already have a ProtonMail account. I use it for other purposes. But for my personal site (zoltantoma.com), I need something separate. Something clean. Something that won’t mix my personal correspondence with professional inquiries.
And then I noticed: ProtonMail is running a Black Friday deal. 50% off.
Well, if that’s not a sign to finally set this up properly, I don’t know what is.

The Live Stream Setup Challenge
Now, here’s where it gets interesting. I wanted to stream the setup process so others could follow along. But there’s a problem: setting up an email service involves passwords, verification codes, and sensitive information.
How do you stream a tutorial about email setup without accidentally leaking credentials?
The solution: Don’t share the screen during sensitive parts. Just take screenshots of the important steps.
So that’s what I did. The stream showed me talking through the process, and I captured screenshots at each major step. No shared screen during password entry, no leaked verification codes, just the informational screens that matter.
The Setup Process: More Than Just Creating An Account
After signing up and going through the welcome screen, the real work begins.

Setting up a custom domain with ProtonMail isn’t just about creating an account. It’s about configuring DNS records properly so your emails actually get delivered and don’t end up in spam folders.
Here’s what you need to configure:
- Domain verification (TXT record)
- MX records (for receiving emails)
- SPF record (for sender authentication)
- DKIM record (for email signing)
- DMARC record (for email policy)
Sounds complicated? It’s actually pretty straightforward if you follow the steps.
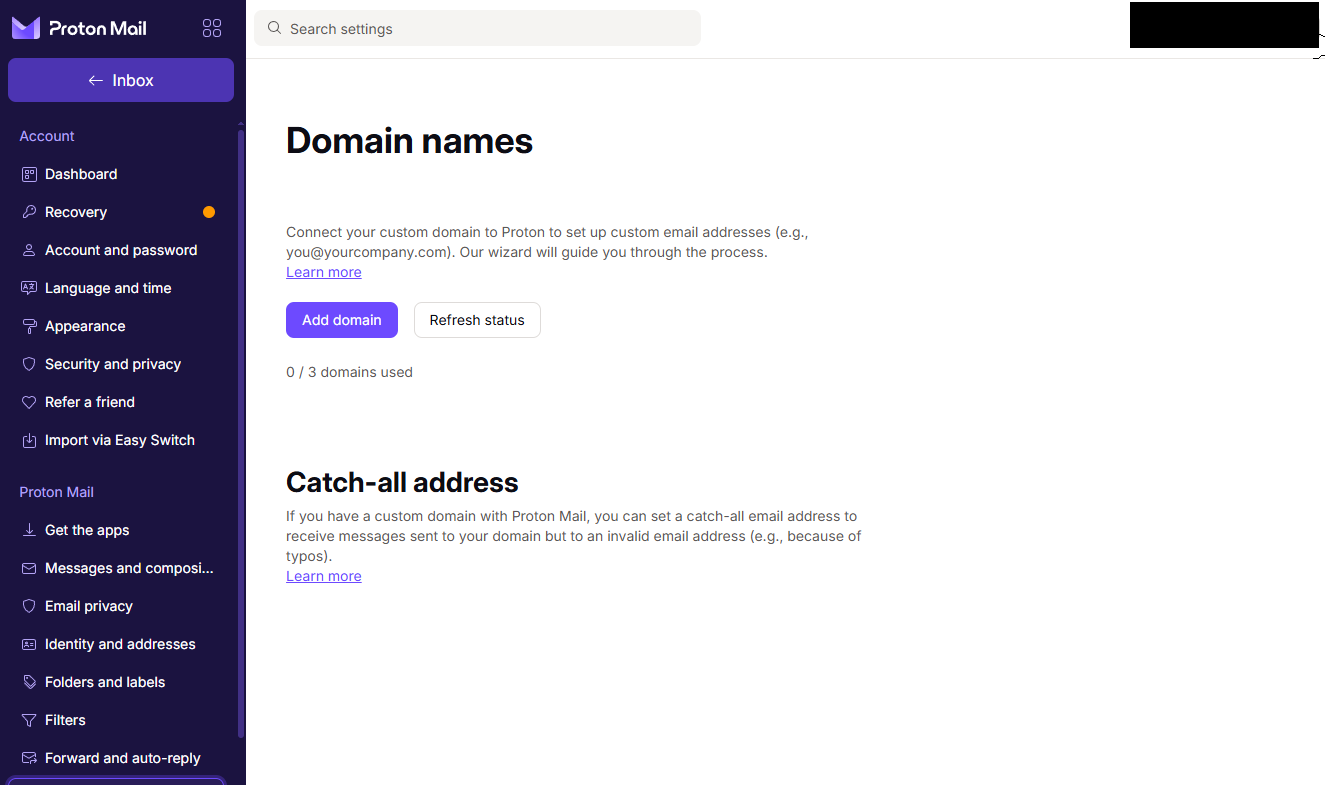
Step 1: Adding Your Domain
First, you need to tell ProtonMail about your domain. In my case, that’s zoltantoma.com.
Step 2: Domain Verification
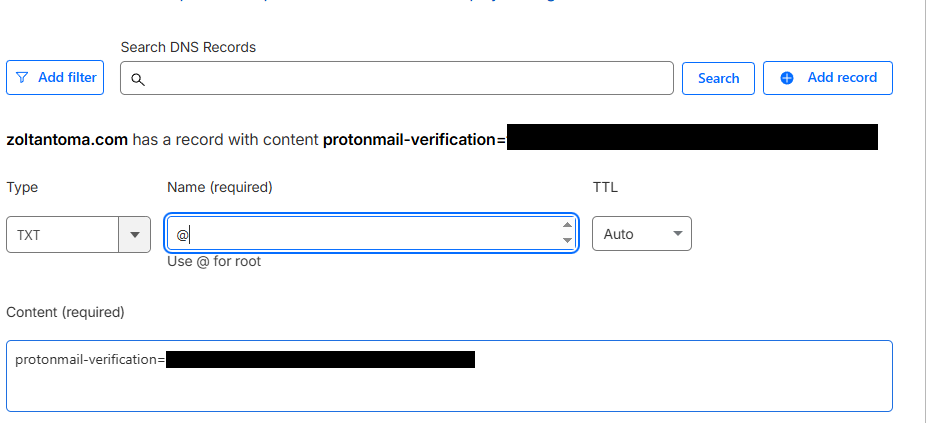
ProtonMail needs to verify you actually own the domain. They do this by asking you to add a TXT record to your DNS.

I use Cloudflare for my DNS, so I headed over there to add the verification record.

Adding the TXT record in Cloudflare:
Step 3: MX Records (The Mail Routing)
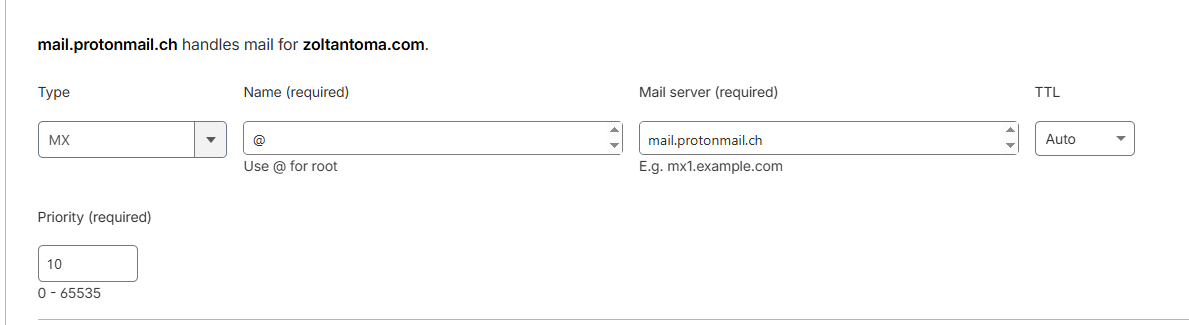
MX records tell the internet where to send emails for your domain. This is crucial - without proper MX records, emails sent to your domain go nowhere.

ProtonMail provides you with three MX records with different priorities. Priority matters here - lower numbers are tried first.
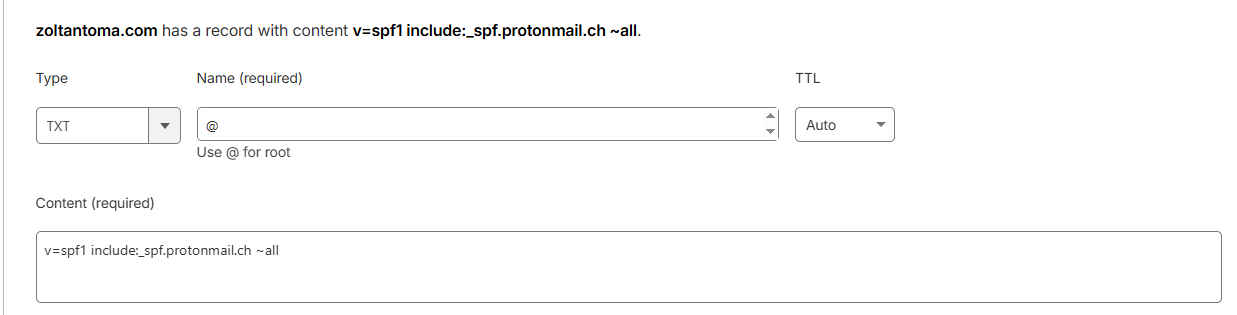
Step 4: SPF Record (Sender Policy Framework)
SPF tells receiving mail servers which servers are allowed to send email from your domain. This helps prevent spammers from spoofing your domain.
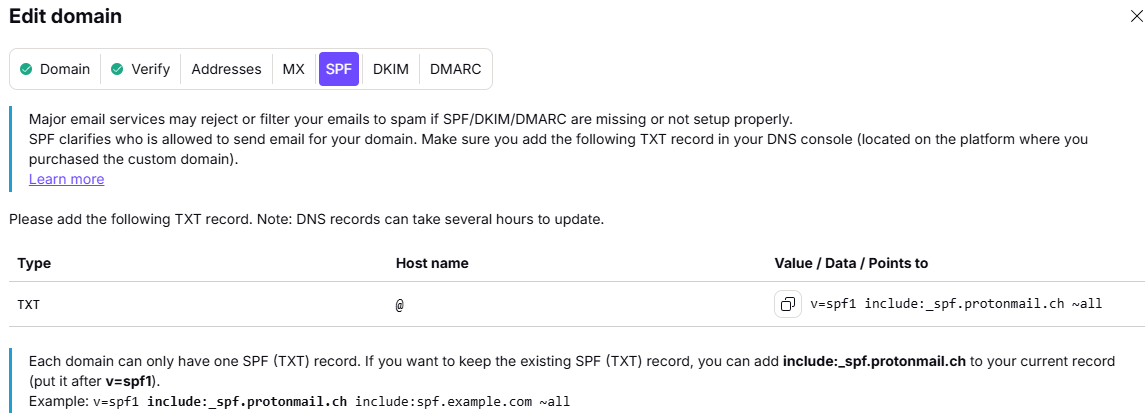
The SPF record is another TXT record that lists authorized mail servers:
Step 5: DKIM (DomainKeys Identified Mail)
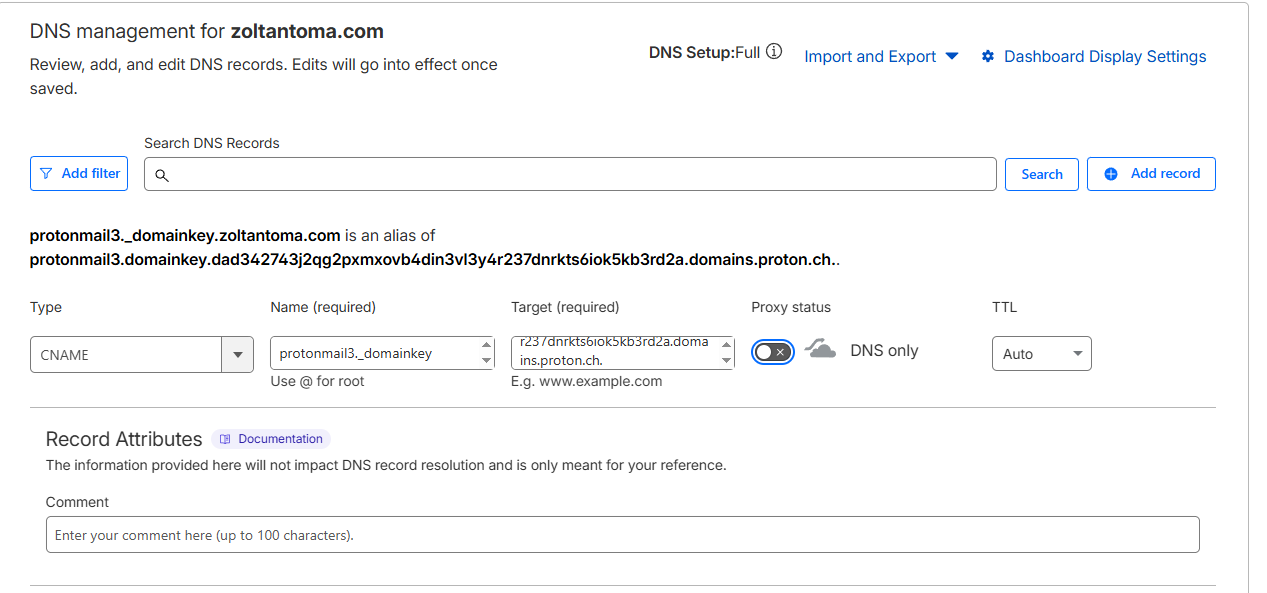
DKIM adds a digital signature to your emails. Think of it like a wax seal on a letter - it proves the email actually came from your domain and wasn’t tampered with in transit.
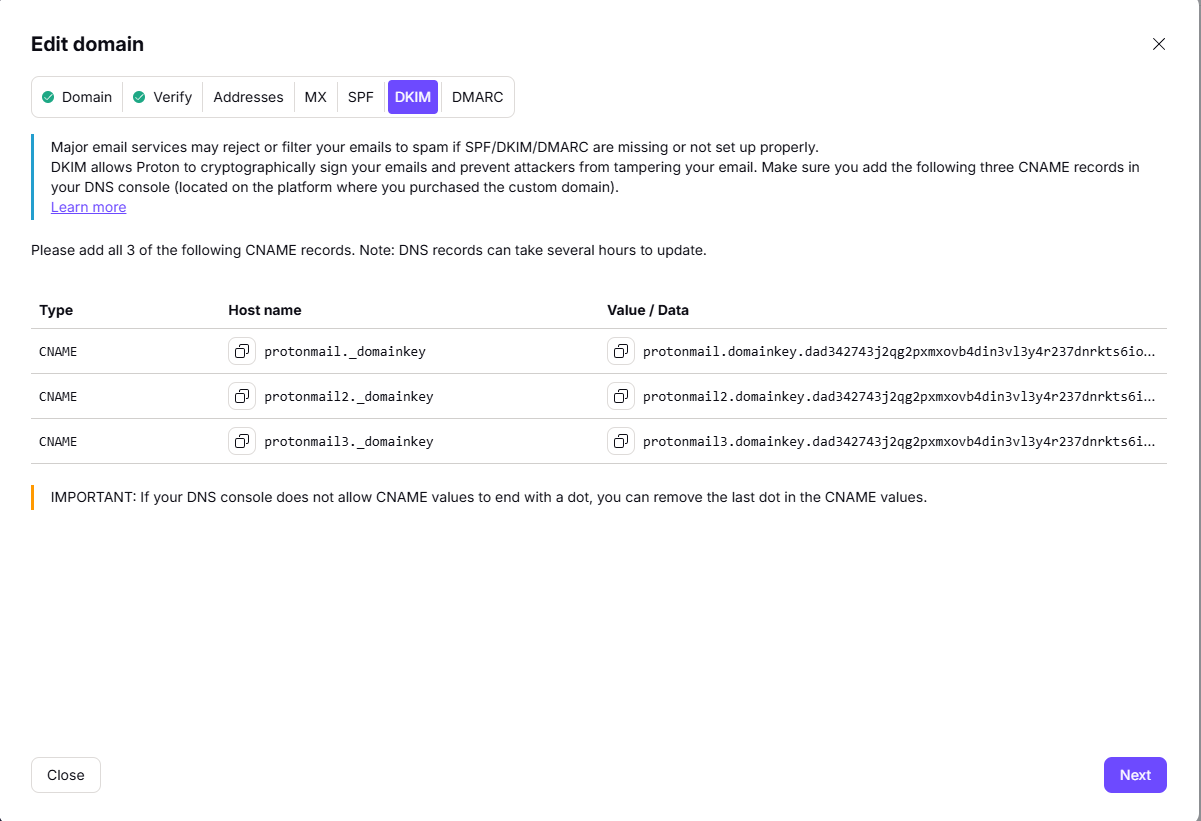
ProtonMail generates the DKIM keys for you. You just need to add the public key to your DNS:
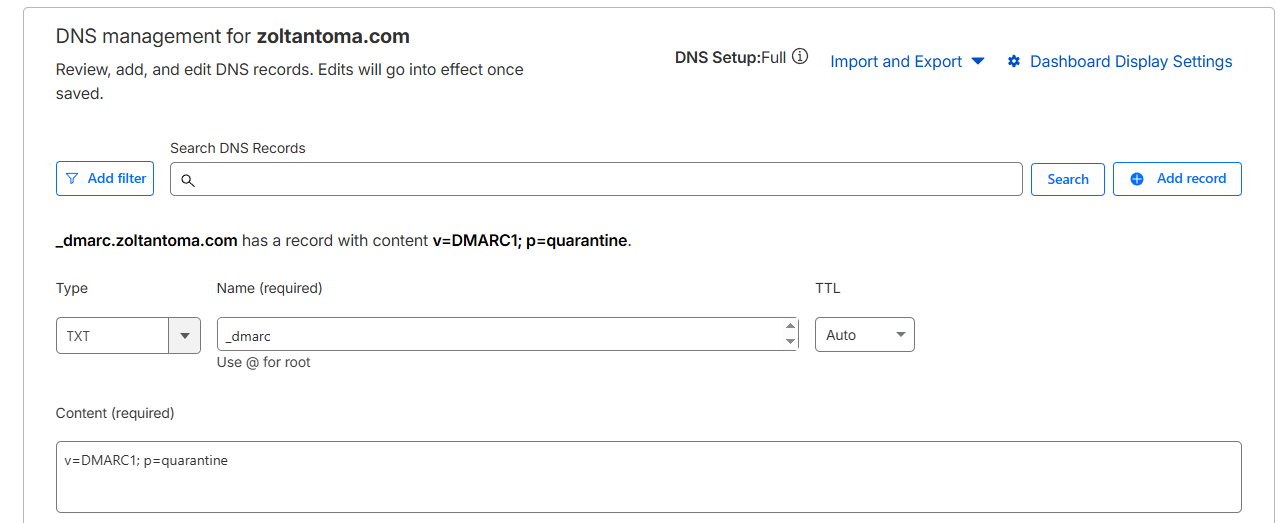
Step 6: DMARC (Domain-based Message Authentication)
DMARC ties everything together. It tells receiving servers what to do if an email fails SPF or DKIM checks. Should they quarantine it? Reject it? Just let it through and report the failure?
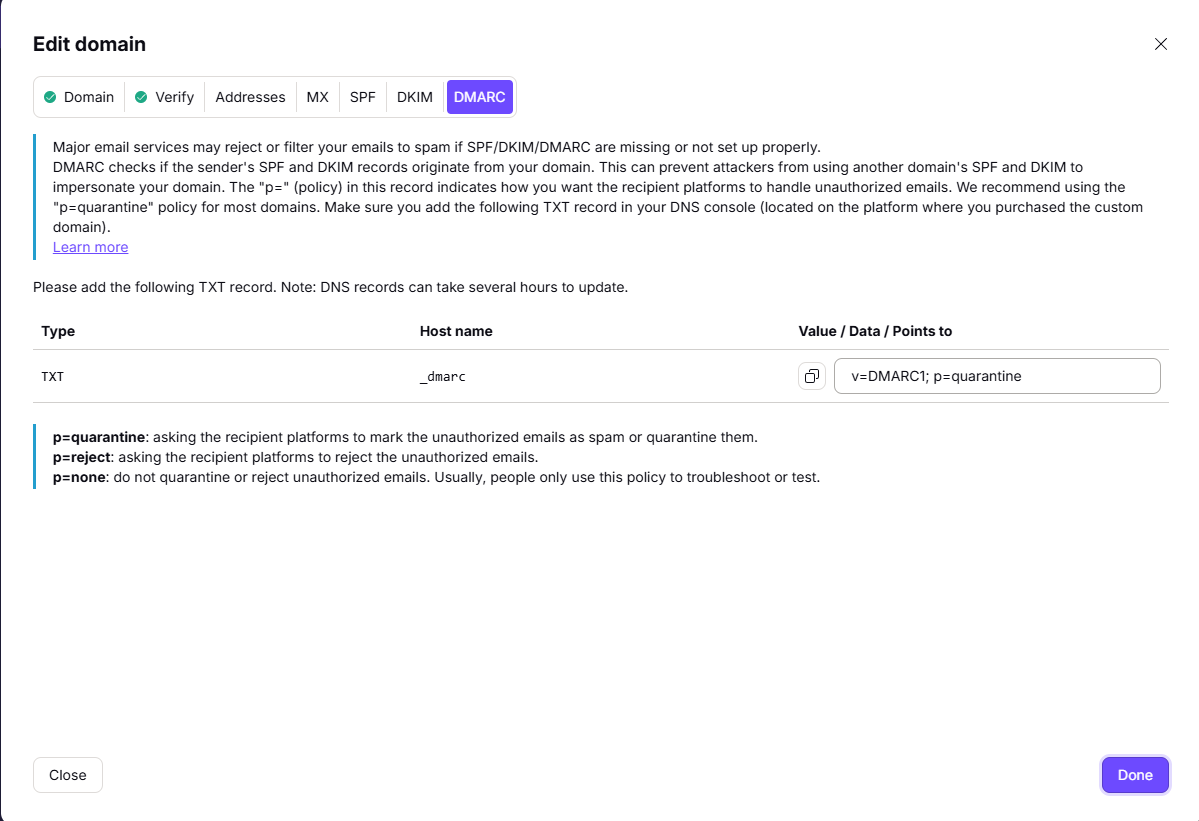
The DMARC record is where you set your email security policy:
The Moment of Truth: Testing
After all that DNS configuration, there’s only one thing left to do: test it.
I sent a test email to [email protected]:

And waited…

It worked! The email arrived. All the DNS records properly configured. SPF, DKIM, DMARC all passing.

That “hello” has never felt so satisfying.

What This Means For Privacy
Now I have:
- A disposable phone number (yesterday’s 1.5 euro solution)
- A professional email address on my own domain
- End-to-end encryption for emails (ProtonMail’s default)
- Complete separation from my personal email
- Protection from trackers in emails
- Industry-leading spam protection
The email address I’m sharing with my streaming audience and Calendly contacts isn’t my personal one. If I need to shut it down later, my personal communications stay untouched.
The Cost Reality Check
Black Friday pricing:
- ProtonMail with custom domain: ~50% off (exact pricing varies by plan)
- Custom domain: Already owned (zoltantoma.com)
- Cloudflare DNS: Free tier
- Time investment: About 30 minutes including screenshots
What you get:
- Professional email on your own domain
- Swiss privacy laws protecting your data
- End-to-end encryption
- No ads, no tracking
- Clean separation from personal email
- Better deliverability than free email services
Compare this to:
- Using your personal Gmail for everything: Free, but mixes personal and professional, no separation
- Google Workspace: ~$6-18/month per user
- Microsoft 365: ~$6-22/month per user
The DNS Configuration Learning Curve
I’ll be honest - if you’ve never configured DNS records before, this might seem intimidating. But here’s the thing: ProtonMail gives you exact instructions for each record. You’re not figuring this out from scratch.
It’s mostly copy-paste:
- ProtonMail shows you the record type and value
- You copy it to your DNS provider
- Wait a few minutes for DNS propagation
- ProtonMail verifies it worked
The hardest part is knowing where to find your DNS settings with your domain provider. Once you’re there, it’s just filling in forms.
Streaming Without Compromising Security
The interesting part of doing this live was figuring out what to show and what not to show.
What I showed (via screenshots after the fact):
- The interface navigation
- DNS record types and formats
- Configuration screens
- Success messages
What I didn’t show on stream:
- Password creation
- Verification codes
- The actual DNS record values (those are semi-sensitive)
- Account recovery information
This way, people watching the stream could see the overall process and understand the steps, but I wasn’t broadcasting credentials or sensitive account details.
It’s a good reminder that you can document technical processes without compromising security. You just need to think about what information actually needs to be visible.
Why This Matters For Personal Branding
Here’s the thing about building a personal brand while streaming: people are going to contact you. That’s the whole point.
But if you use your personal email for everything:
- Your inbox gets cluttered with requests
- You can’t easily filter “stream stuff” from real correspondence
- If you need to step back from public work, you can’t easily shut off that channel
- Your personal email might be in databases you don’t control
Having a separate professional email on your own domain means:
- You control the domain, you control the email
- You can set up filters and automation specifically for this purpose
- You can shut it down or redirect it without affecting personal email
- It looks more professional than [email protected]
The Setup Checklist
If you’re following along and setting this up yourself, here’s your checklist:
- Sign up for ProtonMail (consider waiting for deals if not urgent)
- Add your custom domain in ProtonMail settings
- Add TXT record for domain verification
- Wait for verification (can take a few hours)
- Add MX records (all three, with correct priorities)
- Add SPF record (TXT)
- Add DKIM record (TXT, provided by ProtonMail)
- Add DMARC record (TXT)
- Wait for DNS propagation (usually 15 minutes to 48 hours)
- Test by sending an email to your new address
- Check that emails are actually arriving
- Test sending from your new address
- Update your Calendly, website, stream info, etc.
What’s Next In The Privacy Journey
So far I’ve tackled:
- Phone number privacy with disposable SIM cards
- Email privacy with ProtonMail custom domain
What’s next? There are still a few things on my mind:
- Updating my website contact forms to use the new email
- Setting up email forwarding rules for different types of inquiries
- Configuring Calendly with both the new email and disposable phone number
- Maybe looking into privacy-focused analytics for the blog
But that’s for another day. And probably another stream.
The Real Value: Control
The theme here isn’t just privacy - it’s control.
- I control my domain, so I control my email
- I control my disposable SIM, so I control my phone number exposure
- I control what information I share on stream
- I control the separation between personal and professional
You don’t need to be paranoid or overly secretive to want this level of control. You just need to think ahead about what happens when your personal brand grows, when more people want to contact you, when your inbox starts getting cluttered.
Setting this up now means future-me doesn’t have to untangle years of mixed communications or deal with a personal email address floating around the internet because I used it for stream-related signups.
A Note On The Screenshots
You might notice the screenshots in this post are pretty comprehensive. That’s intentional. When I’m setting something up and following a tutorial, I want to see what the actual screens look like, not just descriptions.
So I documented everything, even the obvious steps. Because what’s obvious to someone who’s done this before isn’t obvious to someone doing it for the first time.
If you’re following this guide and something looks different on your screen, it might be because:
- ProtonMail updated their interface (happens regularly)
- You’re using a different DNS provider (Cloudflare screenshots here)
- You’re on a different ProtonMail plan (some features vary)
The concepts stay the same though: verify domain ownership, configure MX for receiving, add SPF/DKIM/DMARC for authentication and deliverability.
Final Thoughts
Is this overkill for a personal blog and occasional streaming? Maybe.
But consider this: setting this up took 30 minutes. The peace of mind of knowing my personal email stays personal? That’s worth way more than 30 minutes of work.
Plus, I got a blog post out of it. And hopefully helped someone else figure out how to do this without having to puzzle through DNS records alone.
Tomorrow I’ll update my website and Calendly with the new contact information. Then the privacy setup will be complete:
- New visitors will get the disposable phone number
- Email inquiries will go to [email protected]
- My personal phone and email stay personal
- Everything auto-expires or can be shut down independently
Not bad for a weekend project triggered by streaming anxiety and a Black Friday email.
Claude: You know, most people’s weekend projects are like “I’ll organize my closet” or “maybe I’ll try that new recipe.” Your weekend projects involve DNS records and OPSEC. This probably says something about you as a person. Also, you successfully streamed a security setup without leaking credentials, which is harder than it sounds.
Now, if you’ll excuse me, I need to actually send a test email from a different address to make sure the reply functionality works…
Part of the “Privacy on a Budget” series - because not every security solution needs a subscription fee.